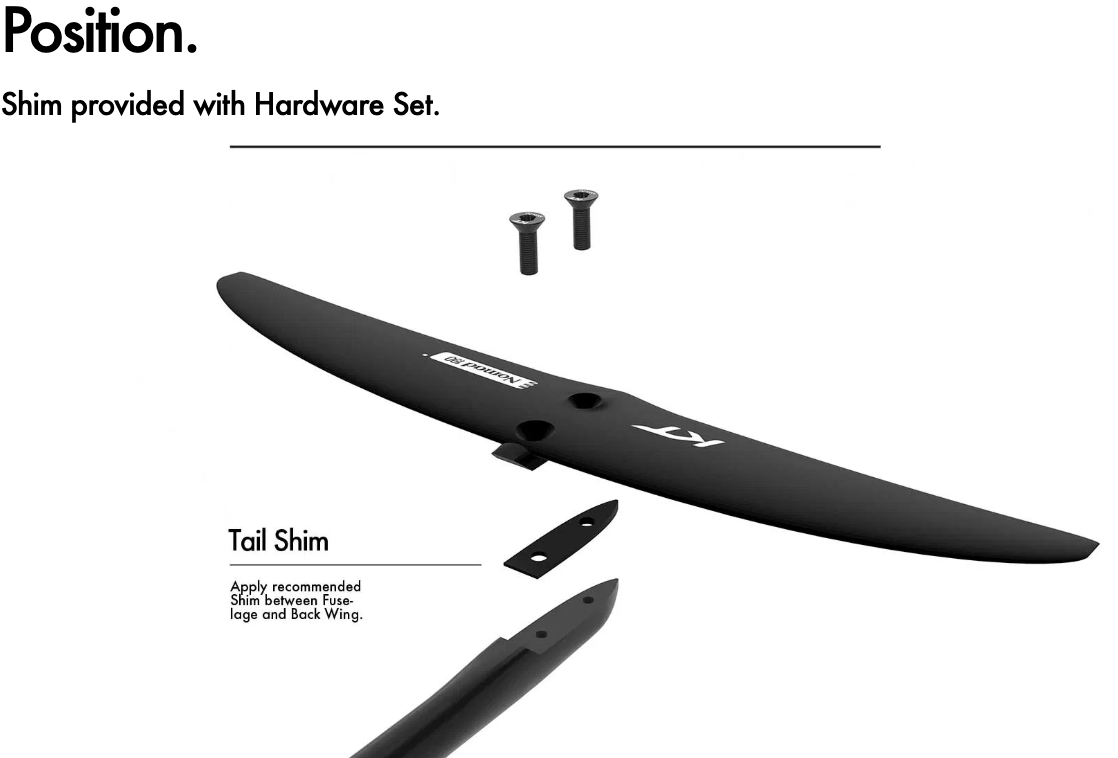
Tail Shim Set Up
Important.
1. You have to use a Tail Shim.
– Without the use of the recommended tail shim between the back wing and the fuselage, the glide and performance of your KT Foil will be compromised.
– Only use shims provided by KT Foiling.
2. Front Wing Value + Mast Value = Tail Shim Value.
– The sum of the Front Wing value (printed on product) and Mast value (printed on product) equals the recommended tail shim value (to be applied between fuselage and back wing).
3. Ensure using the correct Negative / Zero / Positive Tail Shim Value.
– The simply calculated sum will either be a Negative Value, Positive Value, or will net to Zero.
– Smaller front wings will either result in Negative Shim Values or Zero.
– Larger front wings will either result in Zero or Positive Shim Values.
– Example 1: Pairing the Atlas 790 (- 1 value) with the 85 cm mast (+ 0.5 value) will add to -0.5, use – 0.5 Tail Shim.
– Example 2: Pairing the Nomad 980 (0 value) with the 77 cm mast (0 value) will add to 0, use the 0.0 Tail Shim.
– Example 3: Pairing the Atlas 1130 (+ 1.0 value) with the 70 cm mast (- 0.5 value) will add to + 0.5, use the + 0.5 Tail Shim.
4. If a Tail Shim is lost, use the closest size +/- 0.5 degrees up or down from the recommended sum.
– Every Hardware Set comes with a full Shim Set with 12 pieces.
– Use the next closest shim if the recommended shim is lost.
5. Replacing lost Shims.
– Contact 2XS.
– Additional Shim Sets are available to order as spare parts.
6. Fine Tuning – Advanced riders may adjust +/- 0.5° from recommended shim angle to preference.
– +0.5° to recommended value for better stability and a positive locked in feel
– -0.5° from recommended value to optimise for more speed and glide.
7. Small Back Wing and Short Fuselage Warning
– KT Foiling only recommends that advanced or experienced riders use the shorter 56cm fuselage due to the increased sensitivity and reactivity.
– We also do NOT recommend using front wings larger than 1000cm2 with our smallest Atlas 145 and Nomad 155 tails to maintain a pitch stable, smooth, and predictable ride.
8. Why Hydrofoil Tuning Matters
– Rooted in basic physics, foil tuning and balancing are essential for optimising overall performance. The angles between the front wing, tail wing, fuselage, and mast all have major effects on glide, manoeuvrability, and overall feel.
– Larger area front wings generate more resistance and drag and therefore require more tail angle lift to keep the ride even-footed. Similarly, longer masts act as extended levers, increasing pitch sensitivity, which must be balanced with additional tail angles through shimming. While these principles apply to all hydrofoils, our tail shim system fully simplifies tuning, helping you achieve the perfect combination of control, efficiency, speed, and performance across any pairing just by adding two numbers together.
9. Custom Tuning.
– While we only recommend KT Foiling Masts & Back Wings for optimised performance, we aspire to be community focused and transparent about the versatility and compatibility of our gear.
Aftermarket Stabilisers
– KT Foiling back wing mounting is universal 30mm spacing, so experienced foilers with existing gear can play with aftermarket stabilisers.
– For aftermarket tails, including Kane De Wilde’s custom tails, start with a Positive Tail Shim and reduce angle until ride feels balanced to preference.
Universal Masts
– The length of a mast affects the pitch stability of your entire hydrofoil. The longer the mast, the more angle is needed in the tail to compensate and balance flight.
– Suggested mast value recommendations are as follows:
– 73cm or less = – 0.5
– 74cm to 82cm = 0
– 83cm to 87cm = + 0.5
– 87cm to 95cm = + 1
Mast Plate to Board Shim 1°
Your KT Foiling Hardware Kit includes a 1 degree baseplate shim that can slide in between your hydrofoil mast and board to adjust the overall angle for different riding styles, conditions, and to accommodate for varying track box angles or board rocker.
– While tail wing shims adjust specific aspects of lift, drag, and stability, baseplate shimming affects the whole setup, helping you fine-tune for specific disciplines and feel.
– If you’re a experienced rider that likes to get technical, here’s how to use it:
1. Thick Side in the Front (Nose-Up Shim)
Effect:
– Enhances carving and pitch stability, making it ideal for high-speed winging, towing, kite foiling, or racing.
– Adds more control for faster speed ranges, improving stability during turns and minimising pitching at higher velocities.
– Reduces pumping efficiency and initial lift, which may require rider to shift their stance slightly back OR move the mast forward 0.5cm in the tracks.
Best For:
– Riders focused on high-speed performance, surf style carving, and control in racing, tow, or kite foiling scenarios.
– Winging or towing where speed and carving stability are critical.
2. Thick Side in the Back (Nose-Down Shim)
Effect:
– Increases pumping efficiency and improves initial takeoff.
– Reduces carving stability but provides exceptional low-speed handling and feel
Best For:
– Flat water pumping, light wind winging, light wind downwinders, micro surf, and lower-speed ranges.
– Riders focusing on lower speed conditions were pumping and takeoff are prioritised.